Wednesday, May 13, 2015

Misadventures in Aesthetics or the Unnecessarily Long Story of My Ghetto Fab Nails and Foot Infection

TL;DR:
I went to an unfamiliar nail salon and walked out with ghetto nails and a foot infection. I had to have bandaids and meds on my painful feet for a full week, at which point I went and got the polish changed on my fingernails and now I have a pretty manicure and uninfected feet. Things I used to cure my infected feet: Neosporin, Hibbiclens, prescription topical antibiotic ointment, bandaids, and prescription oral Amoxicillin.

I didn't take a picture of my infected feet, because that's just gross.
Notice how the gold brought out all the yucky colors in my skin as well?
I have been to five weddings in the past eight months. That adventure will be a separate blog, because, seriously, FIVE WEDDINGS IN EIGHT MONTHS. In addition to this, I have been more sick than I have probably ever been. I had continuous colds from October to December, in December I got the flu, in January I got a secondary sinus infection from having the flu. In February I had strep throat. I was okay in March and April, and I am currently getting over a stomach bug I got from my baby.

My constant illnesses caused my nails, which are normally so very long and healthy and might I add gorgeous naturally, to peel, chip, and develop horizontal and vertical ridges. Biotin didn't help. Calcium didn't help. A wedding on the west coast was looming, and I'd be damned if I was going to show up in California  with ratchet nails among all those perfectly put together California girls. No. So I had already decided I'd go get a full set of acrylic nails. I was at Sally Beauty supply in Pflugerville, and there's a nail salon right next door. It's not my normal one, but I was there, and pressed for time, and they were advertising 20% off.

I rocked all these sexy shoes with toe bandaids.

Ladies, always go with your gut. And if you have a nail salon you regularly go to that you know is clean and safe, just go there, don't even bother walking in a random place. I went into this place and it was dark and dreary inside. I almost just walked back out, but I didn't want to be rude. I was seated at a foot spa that had obviously just been used by another client without being cleaned. As the nail tech started working on me, she pulled each instrument from a paper envelope and they didn't appear clean, just as if they'd been put in a paper envelope after they were used on the last customer. The nail tech cut too close to my skin on the outside of each big toe, and ended up slicing my skin a bit. I swear to you I could almost feel the bacteria feasting on my feet. I thought I'd end up with MRSA for sure.

My gorgeous gold heels
Then came the manicure. I haven't gotten my nails done since my wedding, since, like I said before, they're normally perfectly fine with no polish. It's been eight years since my wedding, and I know that nail polish trends have changed, but I wasn't sure what people were getting done. I had gotten a gold polish on my toes to match my sublimely awesome gold shoes I was planning to wear to the wedding.  I thought my manicure should probably at least sort of match my pedicure, so after consulting my friend Kristen I settled on a glitter fill for each of my ring fingers, and a gold gel polish for the rest of my fingers. The nail tech was too distracted and did not use the glitter fill I selected, and when I picked a gold gel polish, she pulled out a gold glitter I had not chosen, and added them together saying, "the one you chose was too dark, this one will lighten it". The gold on my feet was a true metalic gold, whereas the glitter she chose for me was an orange-bronze gold. Not only that, she put it on all my fingers. So I ended up with a manicure that cost me $70 and made me look like I was headed to Vegas. Not even the cool part of Vegas either, my manicure made me look like I was ready to hit up the Golden Nugget with a cigarette hanging out of my mouth as I took drink orders from sleezy old men.

I went home and tried to convince myself I didn't hate it. Later that evening, I awoke with both my feet throbbing in pain. I was mentally kicking myself for going to that place because I just knew it wasn't clean, you could tell from looking at it. Even though I don't get manicures very often, I get pedicures with relative regularity. I've been cut in pedicures before, it always heals by morning, or it might sting a little when I'm washing my feet in the shower. Never has it ever felt like this. My toes were red and swollen, and absolutely throbbing. Luckily (I guess) I happened to have some prescription anti-biotic ointment and Hibbiclens from when my daughter had a skin infection. So I scrubbed my toes with the Hibbiclens and smeared antibiotic ointment on the painful parts, took some advil and went back to bed.

In case you thought the "after" picture looked better just
because it was of my palm instead of the back of my hand.
Truth in advertising: the shoe pics have filters, but the nail
pics do not.
The next day my feet still hurt. Obviously I didn't have the time or inclination to return to such a place, since I had gotten this work done on Sunday and was leaving for California on Wednesday, and in the meantime needed to finish up work and make an arrangement for a song Kristen had somehow convinced me to sing with her at this wedding (and that will be another blog too.) So I went to California with my Neosporin, Advil and bandaids and rocked them the whole weekend, telling my sob story to anyone who would listen. I also took some leftover Amoxicillin for good measure. Don't look at me like that, my doctor told me to stop taking them after 10 days instead of finishing the whole bottle. After I got home my feet finally felt uninfected, and I was glad I didn't have to get any amputations or IV antibiotics.

This past weekend was my best friend's little sister's wedding which I was in (yup, two weddings in two weeks) and she wanted us to all get together to get our nails done (scary music plays). I told her I was not letting anyone touch my toes again, maybe ever, but I definitely needed a polish change on my fingernails. The place we went was just miles above the ghetto place in terms of cleanliness and professionalism. I picked a polish color, they used it. Just that color. They didn't cut me, at all, and they made sure I was happy before I left.

Thoughts on Hoarding

My sister once told me that everyone hoards things, and there are different levels of hoarding, 1-5 with 5 being the kind of people you see on the show "Hoarders". I trust her, because she just knows things like this on account of the fact that she reads constantly. You might think to yourself, "What? No. I do not hoard anything." But you do, most likely. You may not realize it though. Here are the definitions of hoarding:

noun
1. a supply or accumulation that is hidden or carefully guarded for preservation, future use, etc.: A vast hoard of silver

verb (used with object):
1. to accumulate for preservation, future use, etc., in a hidden or carefully guarded place: to hoard food during a shortage
2. to accumulate money, food, or the like, in a hidden or carefully guarded place for preservation, future use, etc.


This means, if you stockpile anything, at all, including groceries, say, in your pantry (carefully hidden away), then you hoard. Maybe a level 1, but you do. Unless you are living in a bare room on a mat on the floor with one set of spare clothes to wear when you're washing the other set, with a few things like one book, one toothbrush and one towel, and go out every day to seek your food, then you hoard things. I'm betting most people reading this blog don't live like Japanese monks. That's okay, there is an acceptable level of hoarding, at least according to society. 

It got me thinking though, about the odd things people hoard. Rich people, for example, hoard things like cars, jewelry and fine art. You might again think to yourself, "What? No. Rich people collect things like cars, jewelry and fine art. To that I say, "collecting" is merely an acceptable form of hoarding. Here are the definitions of collect:

verb (used with object):
1. to gather together; assemble: The professor collected the students' exams.
2. to accumulate; make a collection of: To collect stamps.
3. to receive or compel payment of: To collect a bill.
4. to regain control of (oneself or one's thoughts, faculties, composure, or the like): At the news of her promotion, she took a few minutes to collect herself.
5. to all for and take with one: He drove off to collect his guests. They collected their mail.

The definitions both use the word "accumulate" and that is what they both are, the accumulation of things not currently being used. Here are a few things that I've realized I hoard: dental floss, mascara, and tea. So I took pretty, instagram-esque pictures of my odd hoarding collections (see what I did there?), each of which I totally have a valid reason for, just like I'm sure the old lady on hoarders feels she has a need for the endless stacks of old newspapers and fourteen cats and 5 unopened blenders.

After I took this picture I found an additional woven floss in my travel kit. I have issues.

I have bad teeth, and after two root canals and innumerable fillings I have developed a definite cavity paranoia. This woven floss is what I have found that works the best to clean my gums and between my teeth. For some reason, it was really hard to find after I discovered it, so I got into the habit of buying it every time I saw it in a store rather than waiting until I needed it and chancing not being able to find it. Piled underneath the one I'm currently using there are the sad rejects of times that this happened to me. Except the Colegate one, my dentist gives me those every time I get my teeth cleaned. 

You know, in case the Queen of England ever stops by.

I have such a tea obsession that people give me tea as gifts, and I love it. Tea is an excellent gift for me, even though I clearly already have too much. This doesn't even include my loose-leaf collection which is much harder to stack. Don't ask me why I need three different kinds of chai, or why I bought two boxes of gingerbread spice tea at one time. I have what I believe to be a valid reason, but it's just the hoarder talking.

Putting my hoard on a silver platter makes it prettier.
There are probably people who have more mascara than me, but I think having four at once, including one that has sat unopened since September constitutes hoarding. The smaller two are samples, but I intentionally went and got the D&G sample even though I already had the other three tubes, because free mascara, that's why.

Wednesday, May 6, 2015

Refurbishing the World's Stinkiest Dresser- Girls Room Post #3

I sold Bella's dressers before I bought a new one. This may seem ill-advised, but I really had no choice, since I had to raise the money to purchase new stuff. I thought it would be no biggie, and I could go to garage sales or scour Craigslist for something I could redo. What I found was that people on Craigslist are totally delusional about what their old crap is worth. It was damn near impossible to find a dresser for under $200, and that was for something that probably didn't cost $200 to begin with, like, a particle-board out-dated Ikea piece that you can't even refinish. Forget about solid wood, apparently, solid wood furniture is worth its weight in gold to the citizens of Craigslist. 


Finally I found one I could afford and refinish, in Coupland. Coupland, for those of you who have never been there, is a tiny town between Hutto and Elgin which is pretty much adorable. It's all rolling farmland and a post-office and a little white church. I don't know the people who sold me this dresser, but either they have a terrible hoarding problem or they are professional Craigslisters. When we showed up to the address they gave their yard appeared to be sectioned into parts, one part was full of old office furniture, one part was filled with old children's plastic outdoor play-houses and climbing toys. One part was for long-dead appliances. And it smelled. It smelled really, really bad. They were offering the dresser for $25, and when we got there I realized I had my work cut out for me. I really didn't have any other choice though, given that it was wood, and 1/10th the cost of most of the rest of the dressers I'd found.
Oh God, what have I gotten myself into?

When we got it home I examined it more carefully. I realized then that the dresser itself smelled really bad. I guess the smell of the property covered up the smell of the dresser while we were purchasing it. It had names carved into it with ball-point pens and knives, and when I removed the drawers I found that not only were there no failsafe to keep them from just toppling out on a little girl's head, but a mouse or two had been living inside the drawers and the interior was crusted with feces. Yay!
This swiffer is not cutting it.

I was sort of tempted to put it out at the curbside, but then I'd be out $25 and still have no dresser. I thought, I can scrape out all the mouse turds, and then I bet the smell of the wood-stripper and the new finish will cover up the dresser's stank. I put on some rubber gloves, a face-mask and some goggles because I was NOT going to come out of this with tuberculosis or black plague or god knows what horrible illnesses one gets from handling mouse turds. After much scraping, scrubbing, bleaching and cleaning, the dresser still stank.
Seriously? Who sticks gum to their own dresser???
When I went to pull out all the drawers to refinish each, I realized how badly worn the dresser was, I actually had to pry out all the rusty nails and rebuild each drawer from scratch, and one needed a whole new bottom. So I had to go to Home Depot to get some more plywood of the correct thickness, and wood filler so that the nails would have something to be hammered into.
The drawer with its new bottom, and a few dryer
sheets that did no good at removing the stank.
When I went to remove the drawer handles I realized they were affixed with not one screw through the center, but two through each end, this was a problem because I had purchased some absolutely gorgeous drawer pulls that would now need to be centered between the two holes on each drawer, and then I wasn't sure if I could fill and properly cover the original holes. In the end I had to go back to Hobby Lobby to purchase some crown-shaped embellishments to cover the appearance of the holes, even after they were filled, sanded and painted over.

This is what the inside of the drawer looked like when I pried it off its base.

After I used the wood-stripper to remove the old finish and ball-point pen ink, then sanded it down, it still stank. But I soldiered on, white-washing it using several coats of a pickling finish so the wood grain would show through.
Old finish stripped, dresser sanded, drawer pull holes
filled, check, check, check.

It. Still. Stank.

I had to use wood filler to cover the previous owner's carvings.
At this point, I almost admitted defeat. Those people had managed to somehow ingrain their stink into the wood itself. I bet I could have  put the whole shebang in a wood chipper and I'd have ended up with a pile of stinky mulch. I then grabbed the Febreze and used almost a whole can of it, soaking the inside of the drawers and leaving each out to dry in the sun. I also put several dryer-sheets in each drawer, and a bowl of baking soda. After all that, it stank slightly less.
A closeup of the pickling whitewash.

It almost looks useable.
I now had to ghetto-rig a system to keep the drawers from falling out on my daughters' heads, since I know them and I know they'll just yank the drawers out willy-nilly with no regard for their own personal safety. So I got some pink parachute cord and drilled two holes in the back of each drawer, one on the right and one on the left, and then drilled corresponding holes in the back of the dresser itself. I measured the parachute cord into lengths that would allow the drawers to be opened fully without falling out of the dresser, then laced them through the holes and tied sailor's knots in the ends of each. For a final safety measure to ensure the knots didn't come undone, I melted each with a lighter and fused them into a little plasticky-nylon ball.
I had to melt the tip of each string and push it through the hole with a nail.

Once through, I used the same method to push it through the hole in the drawer.

I then knotted each end, and for good measure, tied them together in the back.
Finally, I affixed the beautiful knobs I found at Hobby Lobby, and covered the holes on either side of each knob with a pink princess crown embellishment.
I got these on 50% off sale which Hobby Lobby has literally every week.


I affixed the crown embellishments using silicone sealant which dries clear.


Then, when I got the whole shebang into the girls room I realized, ALL TOGETHER, NOW, it still stank.

Face, meet palm.

I then launched a massive search for some sachets. I looked everydamnwhere, and finally found some at Kirkland's. I let Bella pick out two to start with, since they were pretty potent, and we brought them back and put one in the top and one in the middle. That finally killed the stank enough that I could put my daughter's clothes in there without fear they'd end up smelling like they lived in Oscar the Grouch's trashcan.
This is how far the drawers will pull out with the safety ties on the back.

The finished, albeit STILL EFFING STINKY dresser.

Success! I had finally turned that sow's ear into a silk purse! Was it worth it? Hell to the naw. I will never, ever do that again.


Replacing the Drona Boxes With Branas Boxes - Girls Room Post #2

Initially I bought the Drona boxes for the Kallax shelving unit, but at the time, Ikea wasn't offering pink Drona boxes in the US, so i bought half Dronas and half of some pink boxes I got from Garden Ridge. The Garden Ridge boxes were more expensive than the Dronas, and far, far inferior. They have since fallen apart, every last one. When I went to replace them, I could have opted for the pink Dronas, but I wanted something even sturdier so I went for the white Branas baskets instead.
You can see where I tried in vain to patch this one with pink floral fabric.
Horrible pink boxes from Garden Ridge that I tried to repair several times.
The Drona boxes held up better than the
Garden Ridge boxes but were still pretty
worn and bent.
The Branas baskets are much sturdier.


I started with these wallet-size frames that were silver and black
Spray-painted them pink.


Pulled off the picture stand from the back, leaving the hardware.

Then added in a picture and name of the toys in each box.

Ran some wire through the left-over hardware and wired them to the baskets.


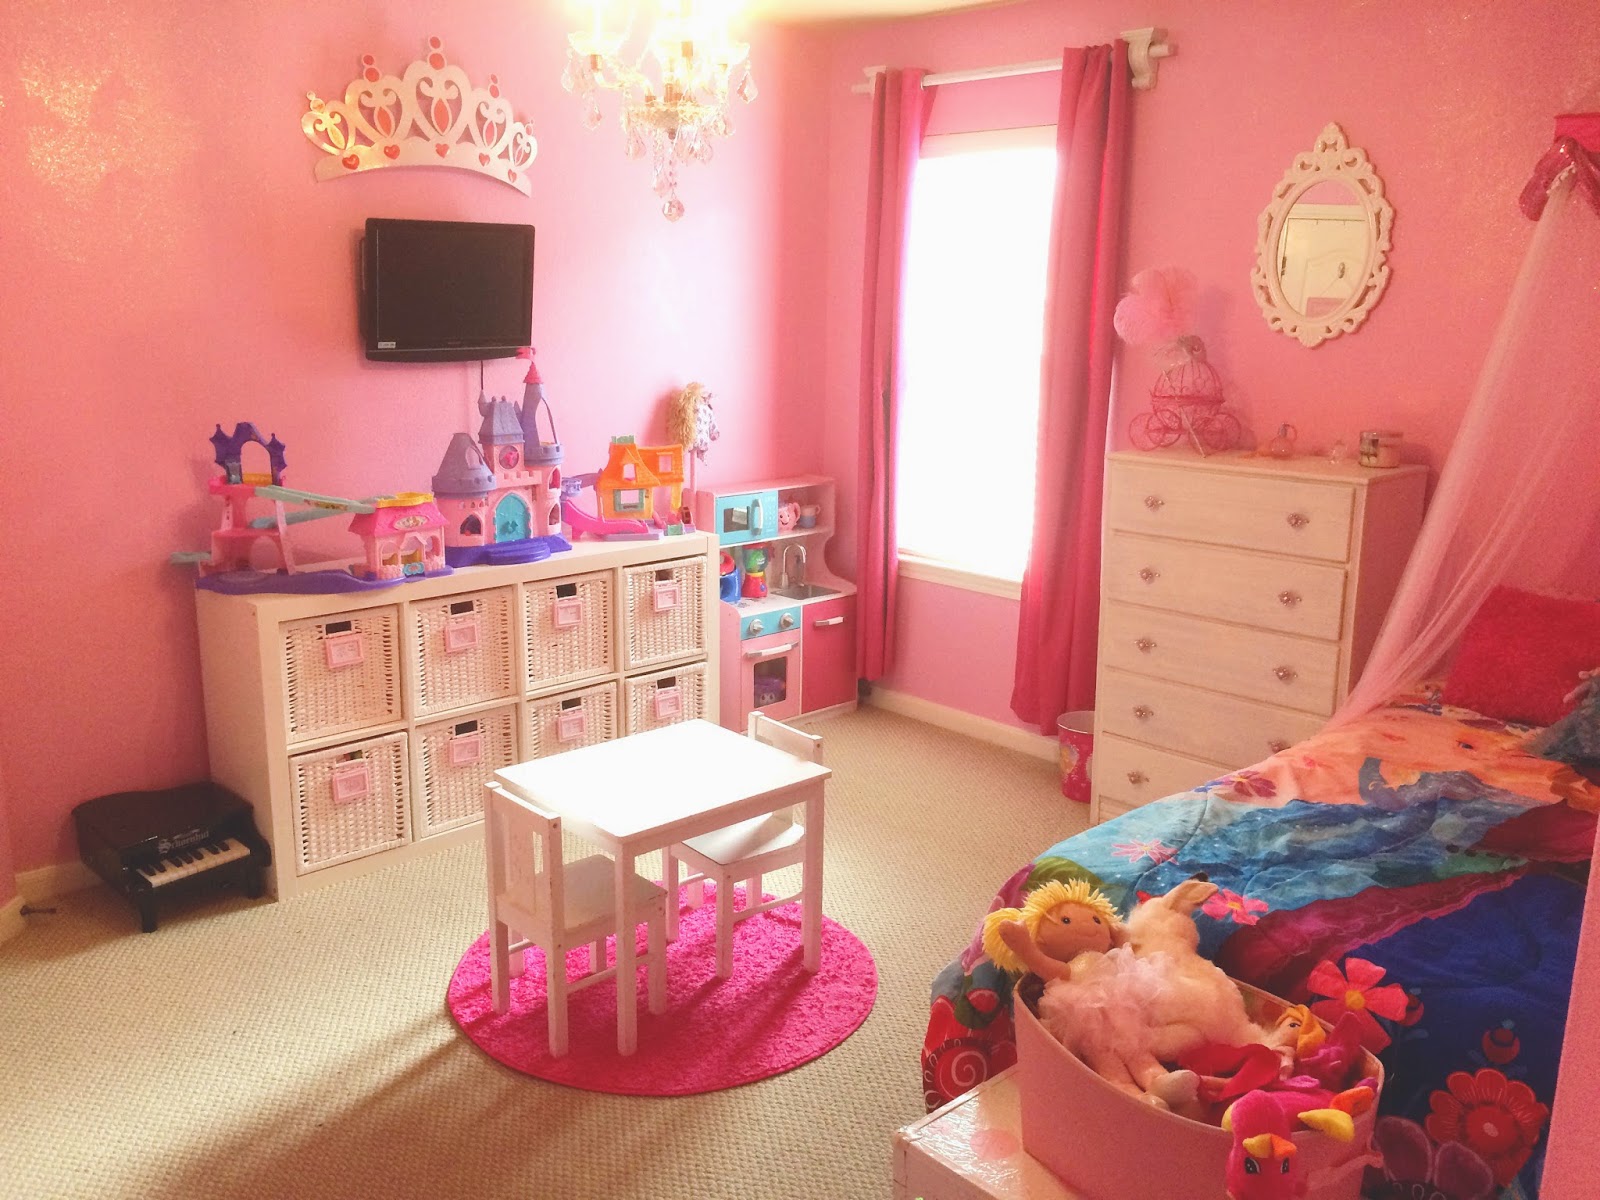
Bella and Vivienne's Princess Room

Two years ago, for her fourth birthday, Eric and I redid Bella's room, in an attempt to get her to start sleeping in there. We bought an Ikea Kura bed and turned it into a little cottage, painted a tree on the wall and added a new light fixture that looks like the sun, and a rug that looks like a stream with rocks and grass. She loved it and played in there a lot...but never slept in there very often. Also, once, she was really tired and she fell out of bed from the top bunk, and that was really scary.


Since she never really slept in there and I was afraid of the height of the bunk bed, I decided to put all her decor on Craigslist and redo the room again. I didn't have the support of the hubs this time around because we had sunk a lot of time and money into the project before and he wasn't willing to do that again. So I hosted my own garage sale and raised the money to redo her room. I had a shoestring budget of about $300, which I exceeded, but I had a lot of the things I needed to redo it. 


I enlisted the help of my close friends Ashley and Davie, because they have a real talent for interior design. Ashley and I went shopping and Davie helped me pick out paint colors, and when it finally started to come together my husband admitted defeat and pitched in to help and cover the costs needed to complete the room.


Initially I painted Vivienne's crib white to match the decor, but then she grew out of it and so this Christmas we put Bella in her twin bed and gave the princess bed to vivi. I am still not done with it, because there's a huge blank wall near Vivi's bed. I painted the walls of the girls' room glittery pink. I used the disney color (I think it was Belle Bow Beauty or something like that) and their glitter top coat as well. I still need to go over it again with another coat to hide the roller marks, but honestly the girls don't care so it's hard to prioritize that. 


I found the dresser on craigslist for $25, and that will have to be a whole other blog because it was a wreck when I got it. I just changed out the Ikea Drona boxes with the Branas baskets, and affixed frames to the front of each to identify its contents.


The Pinterest-worthy pictures are not how the room is normally, so truth in advertising, there's really not enough space in that room for both the girls' clothes, shoes and toys, but the only other option at this point is to put them in their own rooms, and they still depend on each other's presence to be able to sleep.


As you can see, there's quite a bit more junking up the room, but it's still a cute room. And no, I will not show you the inside of that closet. (Scary music plays)

Wednesday, April 15, 2015

Karmatic Retribution...and Bragging

 Karma's a bitch. She really is. I can't tell you how many times I showed up at home and sprang a last minute project on my parents who would then have to rush off to Wal-Mart and stay up until the wee hours to help me finish something I should have been working on for weeks. Now, Bella has daily homework, and I have to say, I tend to ignore it unless there is something she is required to turn in. I am a little miffed at the idea of her having homework every day, because she can't read yet, so it's up to me to keep track of it for her and number one, I am not reliable when it comes to that kind of stuff and number two, I think this teaches the kids that their parents will help them get their homework done. So obviously, this has finally come back to bite me in the ass.

A couple of weeks ago the entire kindergarten had what they referred to as "The Kindergarten Rodeo" which included a parade of children riding stick horses they'd made. You were supposed to do the stick horse over spring break, but I totally forgot about it. The rodeo loomed and one day Bella came home and announced the stick horse was due the next morning.

Eric wanted to use a left over clothing rod we had from when I redid my closet, but first of all, those things are stupidly expensive so I didn't want to chop it down for use as a homework project, and secondly, it was like 2 inches in diameter and heavy, and I doubted Bella could carry it. So off to Home Depot I went at 6 pm. I bought a dowel rod and brought it home, we had some leftover paint from when we painted Bella's room, so I had her help me paint the stick, and that was pretty much all she got to do. I usually have her make her own projects by herself as much as possible, but this time I knew there wasn't time.

Everyone else ate dinner and got ready for bed, and I sat there, cutting up material originally meant for use as a dress for Bella (I bought it when she was 2 and I was determined I was going to start sewing). I was pretty sure this thing was going to turn out looking like something Thanatos would ride into Hades, but I persevered nonetheless. No daughter of mine was going to school in some stick horse made from a curtain rod and an old sock.

Eric got the girls ready for bed as I cursed at my sewing machine, in the grand tradition started by my mother. Now, my mom is basically the living embodiment of Betty Crocker. I swear she exudes sunshine from all her pores, she has endless patience and a kind word and a baked good for everyone. That being said, she's got a bit of a temper on her, and though she was raised in a strict Southern Baptist home, she has a string of curse words she reserves solely for her sewing machine. As a kid, the infernal machine in question was a Kenmore, but now she has a Brother, which I can only assume has been subjected to equal amounts of verbal abuse.

I am certain I exacerbated her complicated relationship with her Kenmore as a kid when I would constantly come home expecting her to work miracles on it. One such time I came home and announced that she needed to make not one but two Indian costumes for "Indian Day" (I went to elementary school before political correctness). I said I needed one, and I had promised my best friend my super talented mom would make her one too. Oh, and I need them tomorrow, mom. My mom worked a full-time job, so she didn't even hear about this until after 5 pm. That blessed woman stayed up until after 2 am finishing those costumes, and when I skipped off to school with them after a good night's rest I discovered my friend had gotten someone else to make one for her already. Oh well, mom didn't need that sleep, right?


I'm proud of the half-assed outfit too. The shirt and hat are from Wal-Mart
and cost a total of $11. The cowboy hat is actually a woman's sized hat,
I had to use my awful, broken Spanish to communicate with a
Wal-Mart employee to find it. The boots would be more appropriate for
"Eskimo day" if that were even a thing.
I have felt bad about that for twenty years now, but karma got me back with this damned stick horse. As he was turning off lights and heading to bed my husband said, "I feel bad going to sleep," and I said, "Don't, this is my punishment. I've been waiting for it for twenty years now." and with that baffling statement he shuffled off to bed to leave me to it. I have never been good with a sewing machine, the main issues I have are threading the damn thing, and maintaining a good speed with the foot pedal. My sewing machine is a Singer, and it seems to have two speeds: almost not moving, and oops, you've sewn your hand to the fabric.

Finally I gave up and started hand sewing it. It took me three hours but I finally finished the stick horse head, and shoved it barbarically onto its pike, presumably as an example to other arrogant stick horses. WARNING: Here's where the bragging comes in: As difficult as it was, I am somewhat amazed that it turned out so well, considering how harried the project was. I can only say that it's a good thing I have my secret hoard of craft supplies, or Bella'd have been riding a stick horse that looked like it came from a dumpster. But now that my kid knows I can work miracles, I'll be required to do this again one day. Until then, I will live in fear of my just deserts.

Doing Things the Hard Way

I keep seeing pins for "life hacks" about how to do things easier or quicker, so I thought I'd toast to my own insanity and blog about a few things I do that are actually much harder than necessary. I wrote a really funny article recently for Wide Open Country called "20 Ridiculous Pinterest Projects That Ain't Nobody Got Time For" and this is sort of the opposite of that. I like to cook and bake, so every once in a while I do things the hard way because I think I do it better. So, without further ado, here are my favorite ridiculously over-complicated recipes:

Cinnamon Rolls

Yeah, you can totally buy these from the grocery store, but dammit they always have raisins and I HATE raisins. Seriously, ew. I could buy them from a bakery but they'd be expensive, and I'd have to get up at the crack of dawn, because if you sleep in all the cinnamon rolls are gone by the time you get there, no matter where you go. Because cinnamon rolls are awesome. This recipe requires a yeast dough, so you have to wait for it to rise. Sometimes I make this the night before I want to eat it and leave the rolls in the pan in the fridge overnight, but they really do taste better made and baked on the same day. So these are for like, when you don't really want breakfast until 11 but you'll still be up at 7. *Sarcasm Font* Totally practical, right?

This recipe is originally a Paula Deen Recipe, don't look at me like that, you can hardly taste the racism. Plus I started making this before that came to light, so my innocence is grandfathered in, right?

Click Here for the Cinnamon Rolls Recipe

My changes:

Sometimes I use coconut oil instead of butter in the dough.

I use half granulated sugar and half brown sugar.

I use milk instead of water in the icing recipe.

I only cook these for 15 minutes, because at 30 minutes they have the consistency of hockey pucks.

I leave out the raisins and nuts.

Lasagna

My mom really only cooks on holidays, and one of her specialties is homemade lasagna. I didn't eat frozen, boxed lasagna until my husband bought it after we were married. Gross. Stouffer's should be ashamed of themselves, because that crap is nasty. I had never had it in a restaurant because I was certain it could never be as good as my mom's, until 2010 when my hubs took me to Little Italy in New York City. I figured if there was ever any place that would be worth trying restaurant lasagna, it would be on Mulberry Street, and was I ever right. I have never been so close to heaven. I have been trying since then to recreate it, but I don't have a drop of Italian blood in me, and I lack the prerequisite Italian grandmother to help me out, so I'm still working on this recipe. I've ended up combining my mom's recipe with one from the New York Times, partially because these ingredients are really hard to find in Texas, and partially because I am too lazy to do it properly (but not lazy enough to ever allow my husband to buy Stouffer's again).

Click Here for the New York Times Lasagna Recipe

My changes:

I use bacon instead of pancetta because it's damn near impossible to find in Texas, and really expensive.

I use cottage cheese instead of ricotta because that's how my mom did it, and I find cottage cheese less annoying to work with than sticky ricotta.

I use ground Italian sausage and ground beef, and don't always bother making the meatballs, but it's better if you do, just more time-consuming.

Chicken Pot Pies

This I got into because my husband practically begged me to make him some homemade chicken pot pies, and I've found that, though it's far more time-consuming than sticking a frozen one in the oven, it's not only lower calorie, it's also way more delicious. I don't make my own pie crust though, I'm not completely crazy.

Ingredients:

You will need four soufflé dishes, like these - I bought mine four to a package from Garden Ridge (now called At Home) for less than $10.

2 Pre-made, rolled pie crusts in box, such as Pillsbury (but I use the HEB brand because I find them to be better)

Carrots, celery, potatoes, corn, peas, green beans or whatever you want in your pot pie, the amount you use will depend on how many veggies you want, I usually use about a half a cup of all of these. You can use canned veggies, and I usually do with corn and peas, but with everything else i generally use fresh and then I sauté the green beans and boil the potatoes, carrots and celery. You want the veggies to be cooked when you put them into the pies. If you use canned, they can be cold out of the can though.

1 chicken breast

1 recipe white gravy, you can use my own recipe from my article on Wide Open Country for biscuits and gravy.

Instructions:

Preheat oven to 400 degrees

Take one pre-made pie crust out of the box and roll it into a ball, kneed it until all the flour on the outside has been absorbed back into the crust. Cut the ball into four equal pieces, then roll each out. 

Form each pie crust inside and around the edges of each soufflé dish, you'll want to make certain to fold a little bit over the top of each dish so that the crust doesn't simply slide down into the dish as it bakes. 

Using a fork, poke holes in each pie crust and put them all into the oven to bake for about 7 minutes, or until the crust looks done, as in, no longer raw.

Take the pie crusts out of the oven and set them aside (you'll want to leave the oven on).

Sautee, boil or otherwise cook whatever vegetables you want in your pot-pie.

Cook the chicken (I pan-fry mine) and dice the chicken once it's cooked.

Prepare the gravy (see linked recipe above for instructions, omitting the sausage and bacon added).

Combine all ingredients in a large mixing bowl until gravy covers everything, then spoon the mixture into the cooked pie crusts. 

Take remaining pie shell and kneed it until all the flour on the outside is absorbed, then cut the dough into four equal parts, and roll them out.

Place one raw pie crust on each prepared pot pie, pushing the crust down so that it sticks to the cooked pie crust. Cut four small slits in the top of each raw pie crust to vent.

Cook each pot pie again until the top crust is cooked, 7-10 minutes.


Pizza

Once I mastered cinnamon roll dough, pizza dough was a breeze. The great thing about this recipe is that it doesn't need to rise, so this doesn't take much more time than any other made-from-scratch dinner. It's still longer than opening a box and turning on an oven, but I get to put as much cheese on it as I want, and I loooove CHEESE. I've also used half the dough to make a thin-crust version, which is really good too. The great thing about making your own pizza is that you can put whatever you want on it. I've made this as a standard pepperoni, a sausage and green pepper, and even a chicken alfredo bacon pizza.

Click Here for the Pizza Crust Recipe

Pre-heat the oven to 425 degrees

Roll out the pizza dough and then put it in your pizza pan

Cover in desired sauce (You can make your own, but I usually just buy pre-made spaghetti sauce)

Cover in grated cheese of choice (I have found that grating your own cheese makes it melt better than buying pre-grated cheese at the store)

Cover in meat (make sure it's cooked, unless it's pepperoni, which usually comes pre-sliced and pre-cooked)

Cover in sliced veggies if you want, these don't have to be cooked.

Put the Pizza in the oven and cook it for 15 minutes.